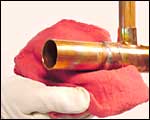
The Basics
Home repairs and projects are becoming more popular everyday. People love their homes, take an interest in them, and enjoy feeling that they can maintain, and improve them. With the right instructions and background, home repairs are easy to do yourself, can be a fun family activity, and can save the expense of calling in a professional.
Copper plumbing relies on a procedure called soldering, and it is not as difficult to do as you might think. The following instructions and techniques produce leak-tight soldered joints between copper and copper alloy tube and fittings. By following these simple instructions and remembering to work carefully, you will be able to produce perfectly soldered joints.
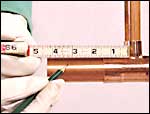
1. MEASURING
Measure and mark the tube with a pencil.
2. CUTTING
Cut the tube to the measured length. Cutting can be accomplished in a number of ways. The tube can be cut with a disc-type tube cutter, a hacksaw, an abrasive wheel, or with a stationary or portable bandsaw. Care must be taken that the tube is not deformed while being cut. Regardless of the method, the cut must be square to the run of the tube so that the tube will seat properly in the fitting cap.
3. REAMING
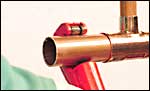
Ream all cut tube ends to the full inside diameter of the tube to remove the small burr created by cutting. It is very important to do this. If this rough, inside edge is not removed by reaming, erosion-corrosion may occur due to local turbulence and increased local flow velocity in the tube. A properly reamed piece of tube provides a smooth surface for better flow.
Remove any burrs on the outside of the tube ends, created by the cutting, to ensure proper entrance of the tube into the fitting cap.
Tools that can be used to ream the tube ends include the reaming blade on the tube cutter, half-round or round files, a pockets knife, or a suitable deburring tool. With soft tube, you must be very careful to not deform the tube end by applying too much pressure.

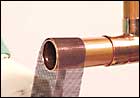
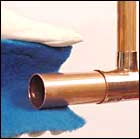
4. CLEANING
The removal of all oxides and surface oil from the tube ends and fitting cups is crucial to proper flow of solder metal into the joint. Failure to remove them can interfere with capillary action and may lessen the strength of the joint and cause failure.
Lightly clean the tube ends using sand cloth or nylon abrasive pads for a distance slightly more than the depth of the fitting cups.
Clean the fitting cups by using abrasive cloth, abrasive pads or a properly sized fitting brush.
The capillary space between tube and fitting is approximately 0.004 in. Solder metal fills this gap by capillary action. This spacing is critical for the solder metal to flow into the gap and form a strong joint.
Copper is a relatively soft metal. If too much material is removed from the tube end or fitting cup, a loose fit may result in a poor joint.
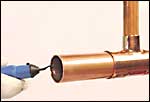
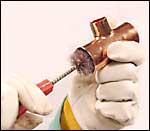
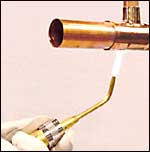
5. APPLYING FLUX
Use a flux that will dissolve and remove traces of oxide from the cleaned surfaces from reoxidation during heating, and promote wetting of the surfaces by the solder metal.

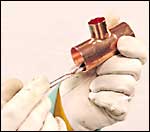
WARNING: Do not apply with fingers. Chemicals in the flux can be harmful if they come into contact with the eyes, mouth or open cuts. Use care in applying flux. Careless workmanship can cause problems long after the system has been installed. If excessive amounts of flux are used, the flux residue can cause corrosion. In extreme cases, such flux corrosion could perforate the wall of the tube, fitting or both.
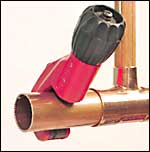
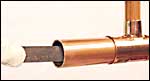
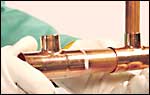
6. ASSEMBLY AND SUPPORT
Insert the tube end into fitting cup, making sure that the tube is seated against the base of the fitting cup. A slight twisting motion ensures even coverage by the flux. Remove excess flux from the exterior of the joint with a cotton rag.
Support the tube and fitting assembly to ensure a uniform capillary space around the entire circumference of the joint. Uniformity of capillary space will ensure good capillary flow of the molten-solder metal. Excessive joint clearance can lead to solder metal cracking under conditions of stress or vibration.
The joint is now ready for soldering. Joints prepared and ready for soldering must be completed the same day and not left unfinished overnight.
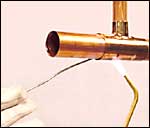
7. HEATING
Begin heating with the flame perpendicular to the tube. The copper tube conducts the initial heat into the fitting cup for even distribution of heat in the joint area. The extent of this preheating depends upon the size of the joint. Preheating of the assembly should include the entire circumference of the tube in order to bring up to a suitable preheat condition. However, for joints in the horizontal position, avoid directly preheating the top of the joint to avoid burning the soldering flux. Practice and experience will indicate the amount of heat and time needed.
Next, move the flame onto the fitting cup. Sweep the flame alternately between the fitting cup and the tube a distance equal to the depth of the fitting cup. Again, preheating the circumference as described above, with the torch at the base of the fitting cup. Touch the solder to the joint If the solder does not melt, remove it and continue heating.
CAUTION: Do not overheat the joint or direct the flame into the face of the fitting cup. Overheating could burn the flux, which will destroy its effectiveness and the solder will not enter the joint properly.
When the solder melts, apply heat to the base of the cup to aid capillary action in drawing the molten solder into the cup towards the heat source.
The heat is generally applied using an air-fuel torch. Such torches use acetylene or an LP gas. Electric resistance soldering tolls can also be used. They employ heating electrodes and should be considered when an open flame is a concern.

8. APPLYING SOLDER
For joints in the horizontal position, start applying the solder metal slightly off-center at the bottom of the joint. When the solder begins to melt from the heat of the tube and fitting, push the solder straight into the joint while keeping the torch at the base of the fitting and slightly ahead of the point of application of the solder. Continue this technique across the bottom of the fitting and up one side to the top of the fitting.
The now-solidified solder at the bottom of the joint has created an effective dam that will prevent the solder from running out of the joint as the side and top of the joint are being filled.
Return to the point of beginning, overlapping slightly, and proceed up the uncompleted side to the top, again, overlapping slightly. While soldering, small drops may appear behind the point of solder application, indicating the joint is full to that point and will take no more solder. Throughout this process you are using all three physical states of the solder: solid, pasty, and liquid.
For joints in the vertical position, make a similar sequence of overlapping passes starting wherever is convenient.
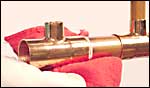
9. COOLING & CLEANING
Allow the completed joint to cool naturally. Shock cooling with water may stress the joint. When cool, clean off any remaining flux residue with a wet rag.